November 03, 2010
Boats And Blinds
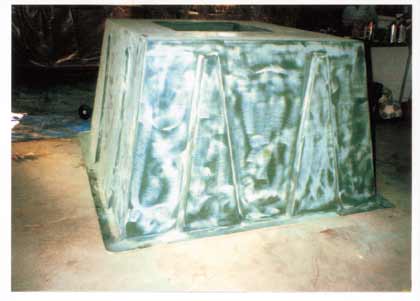
 Steve Kwikkel's field blind begins with a standard fiberglass utility box. He gets them free of charge from the manufacturer by using those that have been rejected because of flaws created during the molding process. |
Steve Kwikkel of Shell Rock, Iowa decided he needed a field blind that could be easily moved between hunting locations as necessary to hunt the places waterfowl move throughout his hunting areas from season to season. The requirements for the blind were that it would provide complete concealment for hunters inside and that and it can also be moved and placed on a semi-permanent basis as a partial pit blind or as a stand-alone, above ground blind. The blinds may either be placed in corn stubble or soybean stubble for waterfowl hunting or within timbered areas for hunting turkeys or deer.
"The heart of the blind is the virtually indestructible molded fiberglass shell," Kwikkel said. "Our original blind shells were the cast-offs from a fiberglass molding company with imperfections preventing them from being used for underground utilities and they were free for the asking. Most utility companies carry the same types of fiberglass boxes, which you can buy or pick up for free when they are discarded for damage or imperfections. The materials we used to complete the original blinds cost less than $50."
Advertisement
First, the utility box should be cleaned of any dirt or oil on the exterior surface so paint will adhere to the outside of the box. Then, with a mechanical or hand sander with coarse grit sandpaper, the exterior is roughened in preparation to painting it with a coat of primer. Since the surface is fiberglass, an appropriate facemask or safety breathing apparatus is mandatory when sanding the box.
After the surface has been cleaned and sanded, one or two coats of primer are needed to cover the box. Porous fiberglass soaks up paint in large quantities, so usually two coats of primer are required. After the paint manufacturer's specified drying time and according to other label directions, it's time to roll, spray or brush on one or two finish coats of tan or khaki paint.
Advertisement
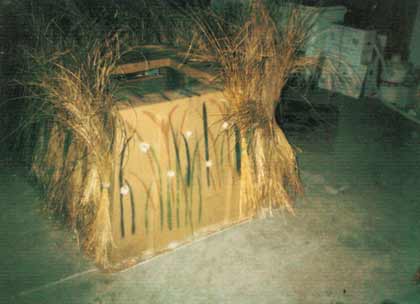
Using commercial or handmade stencils, spray paint in aerosol cans is used to paint the box with camouflage colors to blend with the expected landscape conditions where it will be placed for hunting. On Kwikkel's original blinds, he simply cut grass or reed shaped stencils from heavy cardboard stock paper to break up the outline of the box and used aerosol cans of spray paint to camouflage the blinds through the holes in the stencils.
Further camouflaging was created with the addition of vegetation to the exterior of the blind. Velcro straps were used to hold the vegetation in place.
"We used three-inch strips to bind long ditch grass bundles to our blinds," he said. "By cutting the strips into three-inch segments, you can reverse the first 1„2-inch of each segment to hold it together. Using the appropriate drill bit size for a nut and bolt, you begin to drill holes along a staggered line around the midsection of the blind. You'll want the holes staggered six to eight inches apart horizontally and up to 12 inches vertically around the outside of the blind. This reduces any straight lines that will appear to be unnatural. Continue the process around the entire exterior of the blind. You might also consider placing a Velcro strap or two directly in the center of each corner of the blind. The box is thick enough to accommodate the attachment of camouflaging brush at the corners and this will greatly reduce the straight-line effect of the box."
 |
A bolt with a washer is placed through the center of each Velcro strap from the outside and another washer and nut placed on the bolt on the inside of the box wall secures the strap. Bolt ends should be cut and ground flush with nuts for safety and the nuts glued in place.
"The blind allows the addition of many features," Kwikkel said. "The coolest feature we've used is a simple, round closet light powered by a 9-volt battery. The push button light is easy to attach anywhere on the upper portion of the blind so it is out of the way until you need it."
A four-foot shelf is attached using three galvanized hinges spaced as necessary. Personal choice dictates the location of the shelf inside the blind. The shelf should normally be attached along the front of the blind, but it can be placed elsewhere.
"Because the utility box opening is offset at the top, I prefer the front to be the side facing the largest flat surface area of the top," he said. "Ninety-degree angle brackets are used to support the shelf when it is let down and the shelf should be level when it is fully extended. A minimum of three round Velcro tabs are then spaced out along the length of the shelf so they match the other half when they're adhered to the side of the blind."
The blinds are extremely sturdy and can be used under the harshest conditions waterfowling can dish out. For field hunting of ducks and geese, the blinds can be buried to any depth without worry of decay or rot. A plastic bucket or camp chair is all that's needed for a hunter to be able to sit inside the blind for complete concealment.
An added touch is the construction of a two- by two-inch wood frame measuring slightly larger than the square top opening and covering the wood frame with camouflage netting to hide the opening in the top from overhead waterfowl. The blinds are less portable than many models of commercial field blinds because of their size and weight. But for areas where they can remain for extended periods of time, Kwikkel said his "Real Blinds" are the perfect solution.
(Steve Kwikkel, P.O. Box 710, Shell Rock, IA 50670, (319) 885-6611.)
Kwikkel's Real Blind Materials List:
1 - Fiberglass utility box, 52"Lx32"H with a 413„4"W an offset opening measuring 22"x233„4"
1 - 4' 1"x6" pine or oak board interior shelf.
2 - 90-degree angler shelf brackets.
3 - Galvanized hinges for shelf.
50 - 1„2" to 3„4" No. 6 or No. 8 bolts with nuts and washers.
3 - Velcro tabs for holding shelf up when not in use.
4 - Yards of 1„2" Velcro strips.
50 - 6" zip straps.
1„2 Gallon latex primer.
1„2 Gallon tan or khaki paint.
1 - can black spray paint.
1 - can each of tan, green, and red spray paint.
1 - tube of Super Glue for nuts.

